Sunday, January 30, 2011

Finished Project Week #4 - Always Making Things More Complicated

Finished Project Week #4
Make Something for the Man (and for me as well).


So, in theory, I could have posted this on Tuesday as I was finished with the ankle warmer for Mr.HowDoYouDo that evening. But I cannot seem to make anything easy on my self.

Here is the bag I made for Mr.HDYD:


It is a cotton fabric with a muslin lining. I even managed to do some decorative but manly stitching. It is filled with dried corn and is heated in the microwave. This is a pretty big bag (11x13), so I heat it for 4 to 5 minutes.

I was inspired to make the handle by Katy over at No Big Dill. What a brilliant idea. I always make the bag a little too hot to handle!


It was a hit and has been used several time this week already, it even helped when he slipped on the ice and hurt his back on Friday. Ouch!


Like I said, I could have been done early but no, I decided that I would test out a pile of fabrics:


and test out several different fillers


to see what worked best.

 
All of the fabrics (cotton, silky polyester, flannel, minky) did fine in the microwave. I was worried about the minky, but it had no problems.

 
Here is how I tested the filler: I made 6 inch square bags with different types of filler that I had read about other people using. (I only used one layer of muslin for the test bags, but I really recommend using a thicker fabric or two layers of a thin fabric to prevent burning your skin.)


I put them all in the freezer over night and rated how well they stayed cold (good, better, best). I then put them in the microwave for one minute one at a time and timed how long before they cooled down.


Here are the results:


Rice: Best at cold . Stayed hot for 20+ minutes
Barley: Best at cold. Stayed hot for 25+ minutes
Lentils: Better at cold. Stayed hot for 20+ minutes
Wheat: Better at cold. Stayed hot for 25+ minutes
Flax Seeds: Better at cold. Stayed hot for 15+ minutes
Dried Peas: Better at cold. Stayed hot for 25+ minutes
Dried Corn: Good at cold. Stayed hot for 30+ minutes
Polenta (ground): Good at cold. Stayed hot for 20+ minutes
Buckwheat: Good at cold. Stayed hot for 15+ minutes


Yes, I am a little crazy, I know. But now you don't have to do this!


Armed with this knowledge I decided to make a therapy bag for myself. It is made with minky and flannel fabric and filled with wheat and dried lavender, I also added some lavender oil. (Note to anyone using essential oils: A LITTLE BIT GOES A  VERY LONG WAY.)


And because I can never resist embellishments, I decided to try a reverse applique for the first time. It turned out pretty well, if I do say myself. The Princess P saw it and has asked me to do this on all of her clothes now.


I also made a sleep/relax mask out of silky fabric and minky. It is filled with buckwheat and a very, very little eucalyptus oil. This one will go in the freezer.


I am going to try and make covers for all the little bags so they can be used in the freezer and for heat therapy bags for all the girls. Lily Bear is not being very cooperative with the sleeping tonight so I will see if I can get it done.

If you have any questions on therapy bags, let me know, I am pretty much and expert by default now.

Thursday, January 27, 2011

Bag Winner Chosen and I Won Too!

Well we did the drawing for the selvage bag and the giveaway winner is (drum roll please):


Tuesday, January 25, 2011

Week #4: Make Something For The Man

Challenge: Make Something for My Husband

Project: Heat Therapy Bag

Is it just me, or does the man of the house usually get looked over or skipped when you are sewing your amazing creations? Mr. HowDoYouDo is incredibly supportive, he oohs and ahhs appropriately when I show him my finished projects, but none of them have ever been for him.
That changes today.

(Our wedding: 2009)

It took a while to figure out what to make for him, but as he was complaining about his ankles hurting at night yet again, the idea light bulb came on.
Mr. How broke both of his ankles in his youth and whenever it gets cold they tend to ache.

(Just a little insight into our family: he didn't break his ankles while tackling other guys, shooting a basket or during some other sport activity, he broke them while he was carrying a flailing actress down a set of stairs while playing the lead in The Pirates of Penzance. I did mention that we are a family of actors right? )

Anyway, I decided to help his aching ankles (and relieve my guilt of never sewing anything for him) by making a Heat Therapy Bag for him.

I am going to try out different materials and fillers to see what works best.
Follow along and see what we come up with.


Speaking of following along, my cousin Mimi over at This-Busy-Mama has been working on the weekly challenges that I have been setting. We live across the county from each other and don't get to see each other very often, so it has been nice to work on this together.
 
She combined weeks #1 and #2 to make a Sienna dress out of fleece.
 (Yes, she did make it for Lily Bear).

For Week #3 Trash to Treasure, she took a dog food bag and made it into totes. Brilliant!


Isn't she amazing!
(She also has some historical pictures of us on her blog. Ack!)


Sunday, January 23, 2011

Things I Learned From Week #3

What a truly fantastic week. One that was totally unexpected, but very much appreciated. Thank you to all my new followers and especially to Karen at the Selvage Blog for running a giveaway to introduce my blog. I am still reeling from it. 


1. The blogging world is an amazingly supportive community. I knew this in theory after reading Matt Logelin's blog that he wrote after his wife's death. I saw how people came together to help a stranger friend in his time of need, it was inspiring. Now, in a small way, I feel like I saw the kindness of strangers blogging friends when Karen ran her giveaway and I got to meet all of you. Thank you to all my new friends.


2. I have the most wonderful and supportive husband. He doesn't understand blogging, but that didn't stop him from helping me redesign my site. He did it all Thursday night when I started panicking because people besides my mother were going to see my blog the next day. I am truly lucky to have him. (Now he is trying to figure out and design blog buttons for me, what a guy.)


3. Having followers is amazing and exciting and really, really, SCARY!


4. I really need to spend some time figuring out how the heck this blogging thing works. I don't know how to respond to comments besides posting another one from me. I will read up this week and try to work my way past my newbie status. Anyone with any good advice on where to go to learn more PLEASE let me know. 


5. A baby (especially Lily Bear) makes for a great ice breaker.


Thank you again for a great and scary week #3.

Saturday, January 22, 2011

Finished Project Week #3 + First Giveaway

Here is the finished project for Week #3.
(Tutorial here)


I added some embellishments because I can never ever resist an embellishment. . . .ever. 


I threw on some buttons and made some selvage rosettes. I want to find a way to incorporate the rosettes in another project down the line. 
Hey, I still have 49 projects to go!

One of these bags is going to my teenage daughter (the Princess P) and one of them is going to Karen over at The Selvage Blog as a thank you for helping out a newbie blogger out of the kindness of her quilting heart. I am still amazed at her generosity in reaching out to me. 

The third bag is going to go out to one of my new followers (and you are all really new followers aren't you?) as a thank you for coming over to see my blog, as new as it is, and being so kind to me, as inexperienced as I am. 

To enter:
1.Become a follower if you aren't already.
2.Leave a comment below letting me know what weekly projects/challenges you might want to see in the future and/or what was your all time favorite sewing project. 
I will do a random drawing on the 28th of all the comments posted. 
Good Luck and thank you again. 

Friday, January 21, 2011

Selvage Bag Tutorial

This is my first tutorial. . . so please, be kind. I tried to take pictures of everything, and my dear husband (Mr. HowDoYouDo) was so helpful.
 Tara over at Tinkerfrog taught the class where I made my prototype at the Mama Said Sew craft party in Fort Collins, CO last Friday night. 


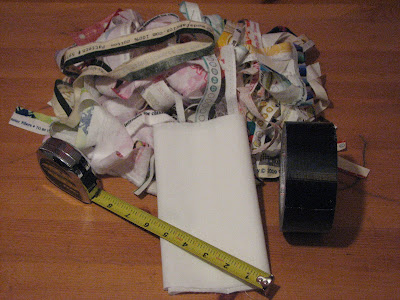
What you will need:


*Muslin
*Duct tape
*Metal measuring tape you don't mind cutting up (the dollar store is a great place to pick one up)
*Lots and lots of different selvage edges


1.Cut one piece of muslin approximately 7 inches wide and 14 inches long. This is going to be the base fabric that you sew your selvages on to. 
(The size can be modified depending on how large you want your bag, the instructions following are assuming this starting size and will make approximately a 6 inch x 7 inch bag.)


2. Sew your selvages on to the muslin. Sew close to the uncut edge of the selvage. Sew each selvage on top of the one before close to the uncut edge (am I making any sense yet???).


3. After all your muslin is covered, use your quilting ruler (that is what this tool is called right?) and rotary blade and cut your block to 6 inches wide, making all sides straight and even.


4. Measure your block and cut in half to make two blocks.


5. Cut two pieces of muslin, 6 inches by 3 1/2 inches.


6. Sew the first piece of muslin to the top of one of the blocks, right sides together.
(Repeat with second block.)


7. Sew sides and bottom of your selvage blocks right sides together stopping just before the muslin.


8. Clip corners and seams and turn right side out.


9. With wrong sides together, sew both sides of muslin (trust me it will make sense eventually, maybe).


10. Fold muslin out and down twice creating a casing. 

.
11. Stitch casing (this was the hardest part trust me) leaving an opening large enough to insert measuring tape pieces.


12. Cut two pieces of measuring tape the width of the bag.

13. Cover measuring tape pieces with duct tape (so there are no sharp edges).


14. Insert measuring tape pieces into casing, one on each side of bag, with the curve of the tape facing out.


15. Hand stitch casing opening.


16. Fold casing down and into the bag. The pieces of tape will be curve out creating a closure in the bag. 


My favorite part is how the measuring tape creates a tight closure. It is such a cool idea. You just bend the tape to open the bag. It has a tighter closure than some of my bags with magnetic snaps! If your bag does not close tightly, it is because the tape is too short for the casing. That happened to me on my prototype, so I sewed some decorative buttons on the bag to make the casing shorter. Worked great.

Hopefully this made some kind of sense. It was a really fun project to make and a definite challenge making the tutorial. If anyone tries the project, let me know how it goes or if you have any questions.


And because most people are here just to see Lily Bear. . . here is the money shot:

Wednesday, January 19, 2011

Salvaging my selvages Prototype and Inspriation

Prototype

Here is the finished project prototype that I made at the Mama Said Sew craft party. 


It was the salvaging selvages craft party taught by Tara.


I made my bag with just the writing from the selvages but the next ones that I make will incorporate the fabric  as well. I am going to tweak the design a little and I may even try my hand at a tutorial. We shall see how the week goes.

At the risk of making my project look pathetic, here are some designs collected on the Selvage Blog. Each photo has a link to the blog post with the designer and creator credit.
Would love to wear this hat!

Would not want this to get wet!
My favorite by far.
This is one of the most amazing sewing projects I have ever seen!

I don't think I sew enough, It would take me a decade or more to save up enough selvages for something like this. Although my cousin is now saving her selvages for me so I might be able to make some more projects later. . . thank you Mimi.


Tuesday, January 18, 2011

Week #3 Trash to Treasure. . . or at least something fun and usable.

Challenge: Make something out of something you would normally throw away
Project: The Selvage Bag.

So a few weeks ago I was lamenting my lack of knowledge in utilizing my own serger.
 I have had it for over a year (Christmas present 2009, thanks dad) and can only use it for the most basic serging.
I started searching for somewhere to take a serger class so I could do more.
 In my searches I found Mama Said Sew

The Creative Station & Fabric Depot in Fort Collins. My new favorite store. They have classes, gorgeous fabric and specialty patterns as well as sewing classes. If you live in NoCo (Northern Colorado) and have not been there yet. . .go, you will not regret it.
I signed up for their "sergers demystified" class that I will be taking this Thursday and I am very excited. 
Last Friday I attended their monthly craft party. Much fun was had by all.
The monthly craft was salvaging your selvages.
We made small bags and pin cushions out of, you guessed it, selvage edges.
It was awesome. The project was taught by the amazing Tara from TinkerFrog
Here we are hard at work at our sewing machines. Don't we look industrious?

This week I am going to take some left over selvage edges from the party and make some bags. 
Trash into something fun and useful.


Monday, January 17, 2011

Finished Fleece Frenzy

Well, I did actually finish my week #2 project within my week time limit.
 However, I fell asleep last night before I could post.

I started out making this hat:
 Lily Bear liked it.
I was actually able to do a decorative stitch along the elastic casing as well.

However, I was not completely satisfied so I went to the store to get another pattern yesterday.
See my last post for details on how that trip went.


I measured Lily Bear's head to see what size I should make. 
Remember how I said she has inherited her dad's head circumference? 
She is 6 months old and wears a 2T/3T size hat!

I made two more hats before I had to crash last night.


 A French Beret.

 A Boater Hat.

Hopefully her head will stay warm now
(However, Mr. HowDoYouDo will need to remember to put a hat on her as we go out the door of course. He likes the beret so I think she may be wearing that one every day.)